Shhh, don’t wake the worms in my little worm bin here.
And as you can see they’re looking quite happy.
I’m going to show you them close up.
But today we’re going to give them a new home.
There’s a lot to be said about keeping worms in general, but a one tote system, it’s a little weak sauce.
We’re going to upgrade it to a three tote system, which is going to mitigate and solve all the problems that a one tote system would have and it’s way cheaper than buying a fancy system from a retailer.
All right, let’s go ahead and give these worms a new home. Okay.
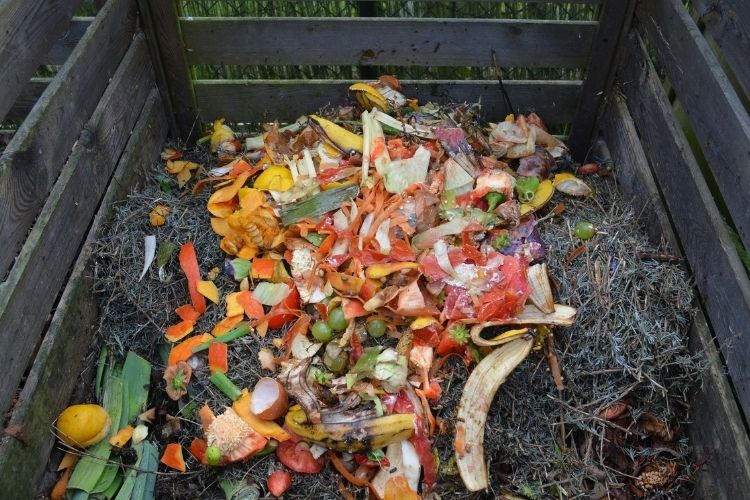
Before we build them their new motel or hotel or condo, whatever you want to call it, we’ve got to take a look at what’s going on.
So we’ve got some eggshells in there.
We’ve got some salad greens and here’s a mixture of their bedding with also some of their worm castings.
We can see there’s a healthy, healthy, healthy amount of worms in here and these are some of the younger ones because they are reproducing.
Worms are self-regulating. They will, you know, make as many new worms as can sort of survive in the system that they’re in.
But the problem with this is it’s gonna, it’s gonna build up, there’s gonna be a lot of worm castings in here.
And then the liquid at the bottom is going to start to compound as well, which is going to kind of suffocate the worms out.
So we need to give them a new home.
And let’s go ahead and run over exactly how that new home works now.
So we have our three totes here. This is the foundation of the worm condo, the worm high rise. But how does it work?
Well, first of all, let’s talk about materials. This is really all you need. You need one lid, you need three Roughneck totes.
I like the Roughnecks because they’re just more durable.
So they were probably 8 to $10 per tote. You’re looking at maybe 24, 30 bucks here. Lids come with it.
So I have two extra lids out there that I’m probably gonna use for something else.
You’ll need something to hold this up and we’ll get to why once we talk about this. This is a cooler drainer, right?
This is something that you put on the bottom of a cooler to get all that ice water out from all the beer you had last weekend, right? That’s what you need.
And the reason why is because the bottom tote here is our drainage tote.
So we’re going to put something, we’re going to put this little drainage thing right here and boom.
Now we have our worm juice drainage.
We don’t ever have to unstack the totes and like dump the worm juice out and do all that nonsense. That’s done for us.
Now the second tote here and the third tote, let’s talk about what we do with those cause the exact same process is going to happen and I’ll talk about why right now.
So on the bottom we’ll just take these out real quick, give it a nice little shake on the bottom. Come on, come on now. These are a little tight guys, a little bit of a tight squeeze.
Okay, so on the bottom here, you’re drilling quarter inch holes on two inch centers and you’re filling the entire bottom.
And why you’re doing that is because you need the worms to be able to crawl up it and you need the castings and the juice to fall down, right?
And you’re going to do the same thing with the other tote.
And then the other thing you’ll do is you’ll drill quarter inch holes along the top here, all the way around the top.
And you’re doing that because worms need air.
So you need to do some aeration for them, right? So let’s put this back.
Let’s talk about how it would work in practice.
The lid goes straight on the top, boom, boom, boom, boom.
You don’t need to drill any holes in the lid because you drilled holes right here and right here for the aeration, right?
So how would it work in practice?
How would we transfer the worms that you saw earlier in the video into this system and make it work? Well, it’s pretty easy.
Pop the lid open, dump all the worms in here, and then once this top tote fills up, we will take it and we will put it in the middle. And then this middle tote, which will now be on the top, will be empty.
We’ll put bedding, we will put food scraps in here and the worms are going to crawl up through those quarter inch holes because they’re going to run out of food in the tote that’s full.
So they’re going to crawl upwards and they’ll make their way into the top tote.
Thus making this completely empty, no worms at all.
Just beautiful organic worm castings.
And then in the top, once that fills up, you just dump this one into the garden somewhere cause you’ve got worm castings and then you just repeat the process over and over and over again.
And anytime the bottom gets full, boom you, you just pop the bottom of this.
You have free worm juice that you can dilute and use in your garden as well.
You can use it as a foliar spray. There’s a lot of stuff you can do with that.
So let’s go ahead and actually build our worm hotel.
So for the cooler drain, you’ve got the drain side here, the attached side right here.
And what I’m going to do is just make sure that this paddle bit will fit pretty well and then we will go ahead and do it.
Now the thing to realize is you want to put it on the recessed section here.
So this is raised, but when you flip it over, it’s going to be recessed, right?
It’s going to be lower. And that’s because there is a little bit of a lip here.
It’s a little bit of a height thing here going on.
And so I want that to be as low as possible so we don’t have, you know, if, if it, if it basically is this much of height, it won’t drain until it reaches over that obviously.
So I’m going to put it on the lower section right here.
Let’s go ahead and drill this in and then we can attach it on the other side.
Alright, we’ll pop it in right here.
Throw this down.
And screw it on. So that’s nice and tight.
Could it be little bit more efficient, little more effective if you used one that wasn’t so raised up? For sure, but I don’t think it’s that big of a deal.
So let’s go ahead and assemble this thing. So our bottom tote is here.
Our second tote and our third tote are going to stack on top of each other and sit just like that.
And then remember we’re putting the existing worms into the top tote. So let me take this here is our old bin.
Let’s let our wormies into their new home.
Oh no, worms overboard. That’s all right. We’ll scoop them up.
We’ll get them in there.
All right, we’re good to go guys.
Well that’s it everyone.
It’s pretty simple.
Our worms are now existing in the top bin here, middle bin’s empty.
This one is our worm juice collector. And we’ve got our little, uh, we’ve got our little cooler drainer down here.
Now, one thing I would mention is the one thing I might change here is I would get a better draining thing.
So what I did is I just picked up the cooler drainer because I was short on time at the hardware store.
I would try to get something that’s a little more flush on the inside because that lip is going to prevent at least a decent amount of the worm juice from draining out.
So you still might have to tip it a little bit, which kind of defeats the purpose of it. But that’s a minor issue.
You can just make that change yourself.
And I’m raising it up on some bricks here or some two by fours, whatever you want is completely fine.
Now we’ll get into future videos on how to actually care for your worms over the long-term.
This was just a solution that I wanted to put up for how to actually make a more long-term sustainable system.
And I’d really encourage you guys, if you want to see variants on this system, my friend Steven over at Nature’s Always Right has a system that’s pretty ingenious for larger scale production.
Something like he’s doing on his market garden that he has a sort of flow tray that will catch all of the worm juice from multiple bins that are horizontally laid out instead of vertically laid out. That’s pretty cool system as well.
There’s a million different ways to do this.
Worms are relatively simple creatures to take care of, but they do a lot for our garden.
So I figured I’d do a little something for them, upgrade them into the old worm condo highrise, better home than I have.
I’m only on two stories. These worms are on three. All right guys, until next time, let me know what you think about this design in the Comments.
If you have any improvements you might make, happy and would love to hear them.
Always experimenting here.
Learning just alongside you.
You’ll see me use these two liter bottles right here in a later video and I encourage you to Subscribe, Like.
Feel free to check the ‘show more’.
Click ‘show more’ down below.
Check out some of the other things I’ve got going on in the Epic Gardening world. We’ve got a podcast, you know.
We’ve got a thriving Instagram community.
We’ve got a Facebook group where people are sharing their gardening stories and their gardening problems all the time. Check those out.
And until next time guys, good luck in the garden.
Keep growing and give your worms a new home.
Leave a Reply